
INTRODUCTION.
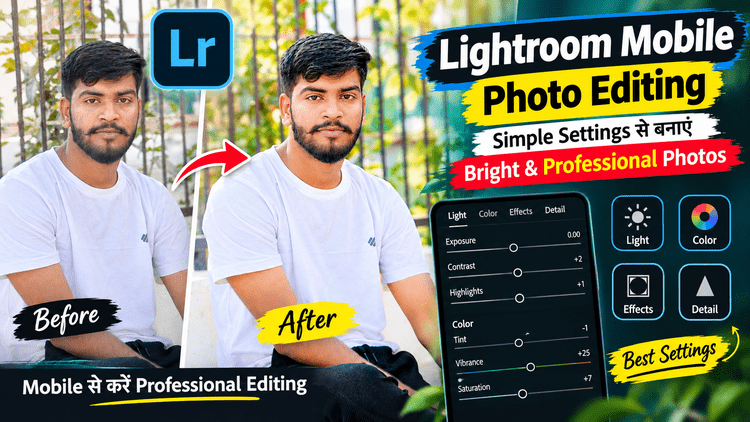
So friends, now a days photo editing is very much trending. I have brought New Trending Lightroom editing tools for you today. I am going to tell you about a Lightroom Mobile editing in which I have tried to give my photo a clean, bright and balanced look without making it too artificial or over-edited. The special thing is that in this editing, I have used some specific adjustments of Light, Color, Effects and Detail while maintaining the natural appearance of the photo. If the lighting, color, detail and overall tone of the photo are correct, then even a photo taken from an ordinary mobile can look quite attractive and professional. That is why the use of Lightroom Mobile Photo Editing is increasing very rapidly. If you also want to give your portrait, Instagram photo, profile photo or social media post a simple but attractive look, then you can try the settings given below according to your photo.
How does this Photo Editing Look in Lightroom Mobile?
So friends, the photo that I created with Lightroom has not been edited too much. Some common color settings have been made in it. Such as. The face should look natural, The brightness of the photo should remain balanced, Colors should be slightly vibrant, The background should not look too distracting, Detail should remain in the subject’s clothes and hair, Give a slight vignette so that attention comes to the subject, Noise should be reduced but the photo should not look too smooth, Overall the photo should look clean and social-media friendly. This type of editing makes the photo look good and real. You can also upload it on any social media platform and it will look quite good.
Which Tools Should Be Used to Edit Photos in Lightroom Mobile?
In Lightroom, use some basic settings for photo editing and do not do too much editing. Light, Color, Effects, Detail, vintage, all these make the photo look good. Using these four sections in the right order makes it easier to control the editing.

How to do photo editing step by step in Lightroom.
Step 1 First, download Lightroom or click on the bottom given below and log in.
Step 2. After logging in, take any one good photo whose background is natural and add it.
Steps 3. Light settings.
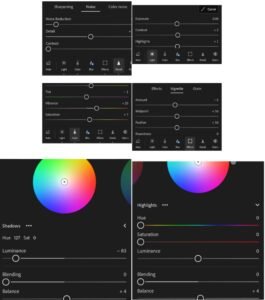
In the editing I have shown, not too many changes have been made in the Light section. Exposure: 0.00, Contrast: +2, Highlights: +1
Steps 4. Color Settings
In this editing, the main values under Color are: Tint: -1, Vibrance: +25, Saturation: +7 .
Step 5. Effects Settings .
Vignette Amount, -5, Midpoint: +50, Feather: +50, Roundness: 0
Step 6. Detail Settings and Noise Reduction
Noise Reduction: +9, Detail, +50, Contrast: 0
What Difference Will This Lightroom Editing Make to the Photo?
The goal of this type of editing is not to completely change the photo. Rather, the goal is to slightly enhance the good things in the original photo. The original photo has natural lighting and colors. Adding slight contrast in Light, some vibrance and saturation in Color, and a subtle vignette in Effects can make the image look more polished. Applying slight noise reduction in Detail can make the overall appearance of the photo cleaner.
Should These Settings Be Kept the Same for Every Photo?
No, this is the most important thing. No single Lightroom setting is perfect for every photo. If your photo was clicked at night, you may need more Noise Reduction. If the photo is in strong sunlight during the day, Highlights and Exposure may need to be adjusted differently. Therefore, use these values as a starting point and make the final adjustment by looking at your photo.
What Are the Benefits of Photo Editing in Lightroom?
The biggest advantage of Lightroom Mobile is that you do not have to depend only on filters. You can manually control different parts such as Light, Color, Effects and Detail. This allows you to edit according to your photo instead of copying someone else’s preset.
FAQ.
1 . Will these Lightroom settings work on every photo?
No, these settings will not give exactly the same result in every photo. You may need to adjust the values according to the original lighting and colors of the photo.
2 . Why is Noise Reduction set to +9?
Here, a slight adjustment like +9 has been used so that the image does not become too smooth.
3. Can a mobile photo be made professional with Lightroom Mobile?
Yes, if you have a good original photo, you can create a clean and professional-looking result by carefully adjusting Light, Color, Effects and Detail.
4 . Should the original photo be kept safe while editing?
Yes, it is always good to keep a copy of the original photo. This allows you to edit it again if needed.
5. Can an image edited with Lightroom be posted on social media?
Yes, you can upload a photo edited with Lightroom on social media platforms.
Conclusion.
So friends, if you want to give your normal portrait photo a clean, bright and professional look without making it too artificial, then Lightroom Mobile is a very useful editing application. The most important thing about the editing used in this tutorial is that instead of completely changing the photo, only small adjustments have been made. You can see this in the photo and article given above and use it. The most important thing is to maintain a natural look while editing the photo. Too much brightness, too much saturation, too much sharpening or making the skin too smooth can make the photo look artificial instead of improving its quality. If you liked this Lightroom Mobile Photo Editing tutorial, then use more Photo Editing Tips, Lightroom Settings like this, create your own photo and upload it on social media platforms as well and get as many likes, follows and views as possible.